I had a couple of plain white tea towels on hand that I used to wrap warm bread and decided I need to paint those and make them my own. This was the perfect time to use my Gelli Arts® plates and ArtFoamies stamps.

This was a fast and fun project but first I needed to know the origin of the tea towel:
Tea towels originated in 18th-century England. They were absorbent towels made from soft, lint-free linen. The lady of the household would use them to dry fine china and delicate tea sets, jobs that were considered too important to trust to potentially clumsy servants. The towels would also be used during tea. They would often be wrapped around the tea pot to insulate it and prevent inelegant drips. One might also use a tea towel to cover a plate of baked goodies before serving.
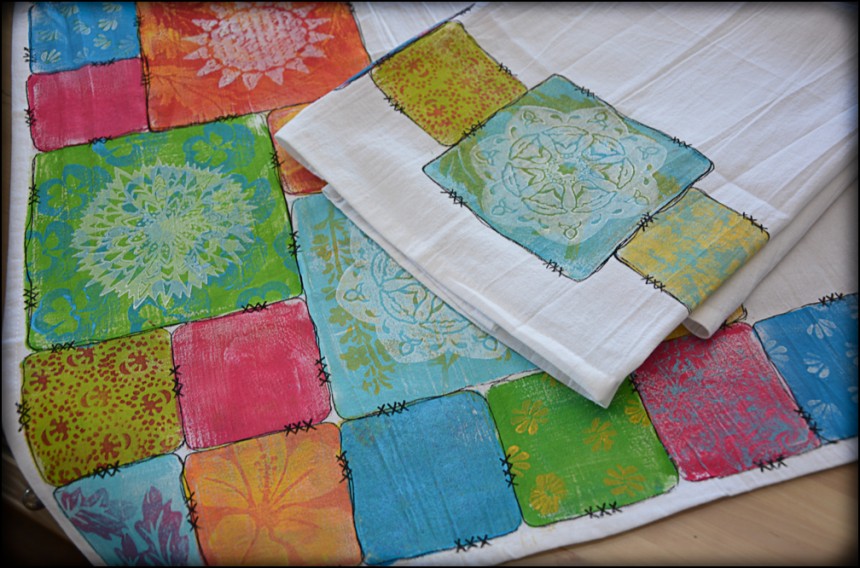
I wanted them to be washable so I used DecoArt SoSoft Fabric Paint. Both towels were made using the same supplies so they would be coordinating in my kitchen. I am drawn to bright colors however you can change the colors to customize to match your kitchen and/or a season. Here are the towels I created:


Both were created very fast and easy and with the same technique, paint colors and stencils.
Step 1 – Prewash and Iron your tea towel.
 Step 2 – Measure and Tape – If you are doing a border on a towel you will want to measure off the center point and start in the middle. For the first towel I measured the starting point and positioned my Gelli Arts® Plate in the middle. The second towel I simply started in the corner and worked my way own. Taping down your towel ensures it stays in place as you are stamping.
Step 3 – Using your Gelli Arts® plates stamp in solid colors. In my case I used 3″ X 3″ and 5″ X 5″ Gelli Arts® plates for the first towel and I altered between them. For the second towel I used the 3″ X 3″ and 6″ X 6″ to make it fast and easy.


Step 4 – Now the fun begins. I gathered all my ArtFoamies and added design and depth to each square. I found a couple of effective methods that really made each square unique. I used contrasting colors to really make them pop. You roll on a thin, even layer of paint to your Gelli Arts® Plate. Stamp your ArtFoamies stamp into the Gelli Arts® Plate and pull the paint away. Then stamp on your solid square on the towel. This is a fun technique I used over and over.

Here is another sample where I used a smaller stamp over and over to achieve a patterned look by pulling the paint away right on my Gelli Arts® plate:

Another idea is to roll the paint out on your Gelli Arts® plates and use it as a stamp pad for your ArtFoamies. Dip the stamp into the paint and then press into your square:

I repeated this on both towels until I had a variety of designs. The ideas are endless!

Step 5 – Stamp large Art Foamies designs using white paint on your larger squares (once each layer is dry). Roll out white paint on your Gelli Arts® plate (make sure you use the size that matches the square you are covering) and use it as a stamp pad for your ArtFoamies. Center the stamp to cover it evenly then press into your square (the good news is if you did not get enough paint you can try it again if you match up the positioning):

Step 6 – Adding the Blacking lining around the squares and faux stitch marks with a liner brush. This can be done with a fabric pen as well if you are more comfortable. I would even take this a step further and hand embroider it and do some stitching on my sewing machine!

Fast and easy. If you have the working space you can complete two matching towels at once!
Here are the materials I used to complete this project:

- Gelli Arts® Plates – 3″ X 3″, 5″ X 5″ and 6″ X 6″ square
- Gelli Arts® Brayer
- ArtFoamies – A bigger variety gives you endless possibilities!
- DecoArt SoSoft Fabric Paints (White, Black, Dark Rose, Santa Red, Ocean Blue, Hauser Light Green, Yellow Green, Cadmium Yellow, Indian Turquiose, and Bright Avocado)
- Painters Tape, Tape Measure
Please make sure to visit www.GelliArts.com and Art Foamies for more fun and giveaways!
Wow…what a great idea. They are beautiful.
Thank you!
Beautiful!!!
Thanks Theresa!
Oh so pretty! Love the bright colors and fun designs. What a treat to see your process. Thanks bunches Tracy! Xj.
So glad you like it!
Who wouldn’t want to receive such fabulous towels?! What a thoughtful gift.
Thanks Dorothy!
This is such fun!
Thanks Jean!
LOVE! LOVE! LOVE! These are fabulous!
Thanks!
A very fun and colorful project! Where did you find blank tea towels?
I wish I could remember but I bet Amazon has them. I have had them for awhile
Delightful!
thank you!